I wrote “diagnose” first, because it’s very important to figure out why your battery went dead. Is it because the battery itself is bad, or do you have another problem in the car causing a draw? So I’m going to show you:
- how to test your alternator,
- how to test for a parasitic draw,
- how to properly clean your terminals to make sure there’s a perfect electrical connection.
That way you know if your battery is bad or if it’s something else. If you do have a bad battery, don’t worry, replacing a battery is super simple.
Car Gift Ideas


I know most of you guys could probably do it with your eyes closed. Even if you’re a pro at replacing batteries, this article will hopefully teach you something new with all the tips and tricks I have.
For example, when you go to buy a battery, you can see different types of batteries, which battery is right for you? Can you buy the least expensive battery, or do you need to buy the most expensive battery? I’m going to talk about the different tiers and which one is right for you.
Another cool thing that I did that I really like – is I cut open an old battery that is bad. Never do this at home, the battery acid is not safe, but the acid has been removed. I’m going to teach you how a battery works. This is going to be really cool to see because you normally don’t get to see this, and you can see on the picture below – is a bad cell:

And I’m going to teach you what causes a battery to go bad:
- from vibrations,
- from heat,
- from discharging it too much.
With that information, you can prevent that from happening to your battery.
And then finally, once we go to replace a battery, I’m going to show you how to do it in a way that doesn’t disconnect the 12 volts from your car. You’ll have advantages like:
- your car’s computer doesn’t reset,
- the clock doesn’t reset,
- you don’t lose your radio stations,
- you don’t lose any presets.
It’s actually a really nifty thing to do. That way you don’t lose that 12 volt connection, which basically resets your car.
Symptoms of dead car battery
So real quick, I’m going to begin by showing you what happens when we go to start the cars with the flat batteries. When I hit the start button, a car tries to start, it turns over a little bit because this battery is so weak. It won’t start, not even close.
If you don’t know where exactly your battery is located – you can read this article: How to locate your battery – real examples and location photos. I will regularly update this article with new locations for different cars.
Let’s check battery connectors
Once you locate your battery, before you grab any tools, there’s two quick things that we could test out. The first thing is to make sure the terminal connectors are nice and tight. Give them a nice wiggle, see if it lifts up.
If your connectors move at all, make sure you tighten it up and that could solve your issue.
Even just a little bit of looseness here could cause the electricity not to flow properly, and that could cause your car not to start.
The next thing to look for is to make sure your terminals are clean and corrosion-free. You should see no corrosion on them and they shouldn’t look dirty. If you do see corrosion or dirt, it’s important that you clean it. You can get the instruction here: How to clean battery terminal posts and connectors
Checking the voltage with a multimeter
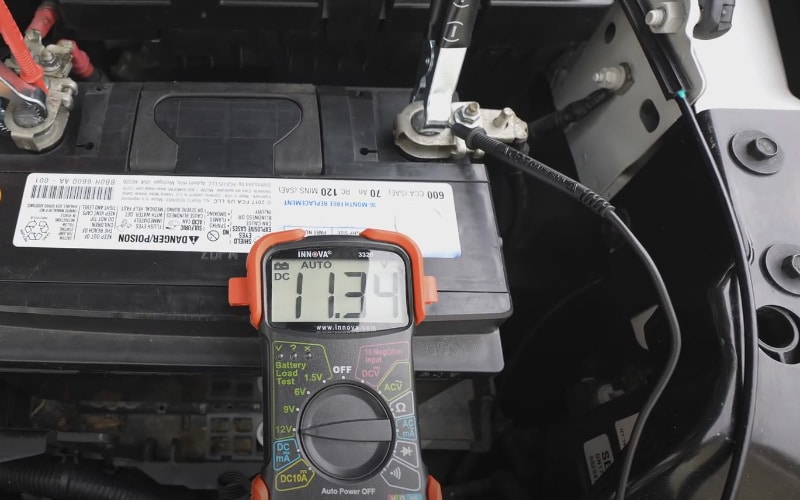
Grab your multimeter. If you don’t have one, you can find these, pretty inexpensive. They’re a great tool to have, especially if you like working on cars. When you have a multimeter, set it to 12 or more DC volts. Grab your prongs, red goes to positive, black goes to negative.

Check it out. When you do this test on your car, you want to see about 12.4 to 12.6 volts. That means your battery is fully charged. If your battery is lower than 12 volts, make sure you don’t have anything on in the car by accident. If you don’t, it could be:
- a bad alternator,
- you could have a parasitic draw,
- battery itself could be going bad.
If you see less than 11 volts, this can tell that you have a bad cell in the battery. Read more below.
How to determine if your car battery has a bad cell
I have an old battery for example. It was 10.5 volts when it was replaced, and it’s the perfect example of why a battery goes bad. I cut it open to show you what causes a bad battery and also how a battery works.
I want to make sure you don’t cut open a battery at home. These are filled with very strong acid, I already neutralize the acid, and I recycled it. But I wouldn’t want you to get hurt, so instead of cutting open a battery, just stick to read this and watch my photos
A battery has six individual cells. Each cell creates 2.1 volts of electricity. The reason why when I saw 10.5 volts I immediately thought, “It’s a bad cell,” is because if one cell is dead, that’s 2.1 volts out of the 12.6, and it leaves you with 10.5 volts. Let me show you inside one cell.

This is what one cell of a battery looks like, it’s a bunch of grids. There’s positive and negative grids in here. The first grid actually broke off from vibration, and that’s what one grid looks like.

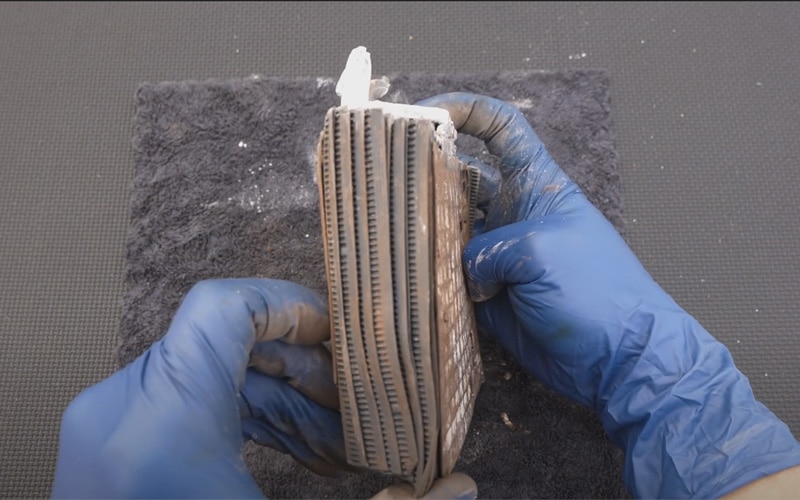
And behind this grid is another grid, and this grid is in a plastic sleeve that is very porous, so it allows the electrolyte and electrons to flow through.
But these two grids can’t short out. If they touch, because they’re right next to each other, they won’t short out, they’re insulated.
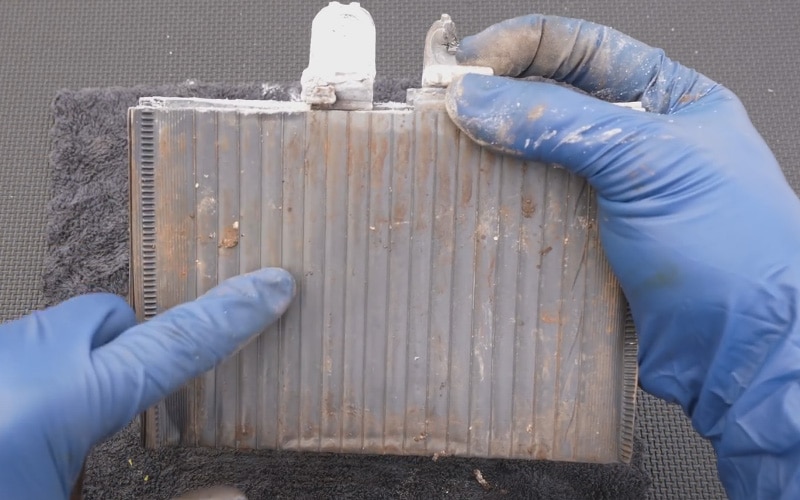
Each of these grids has a paste on it. You can actually see some of the paste has fallen out due to vibration. That’s why vibration damages batteries.
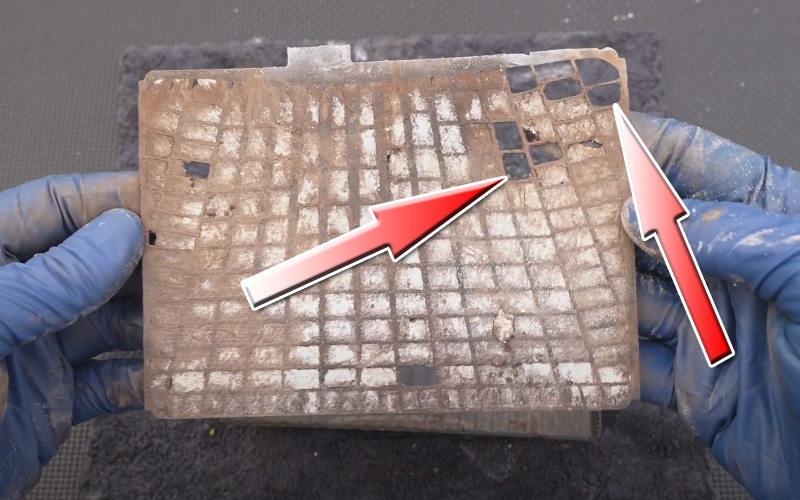
This paste helps with the chemical reaction to create the electricity, so the more that falls off, the less power your battery gets. The more grids you could fit into a cell, the more cold cranking amps you’ll get. And the reason why this cell failed isn’t just because one of these grids fell off. All of these grids are attached to a main piece of metal with very small, very fragile pieces:
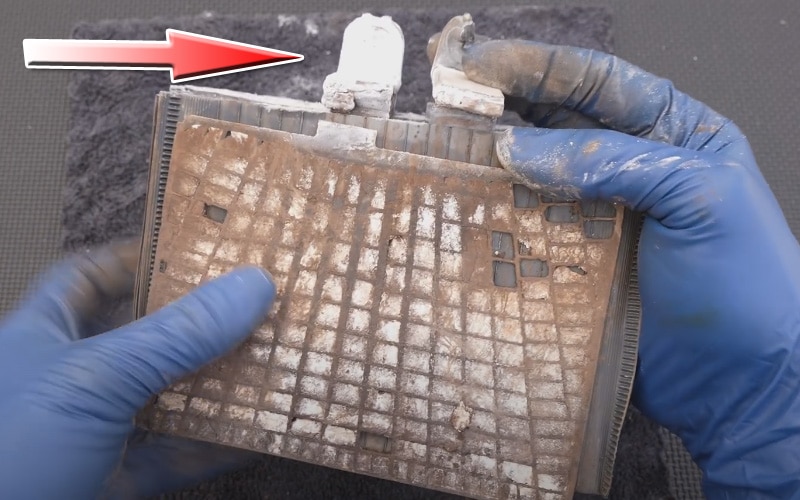
How vibration and heat can destroy the battery
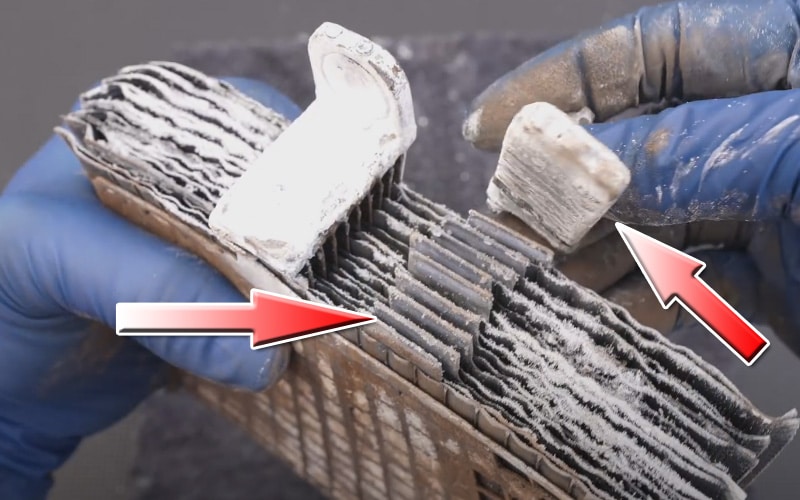
If there’s a little bit of corrosion due to heat, well, guess what? Over time, vibrations will just break that all off, and you lose an entire cell. That’s why vibration and heat are the enemies of a battery. You want to try to avoid it at all costs. And that’s what ultimately caused this cell to fail and give us 10.5 volts.
How to ensure about the bad cell without cutting off the battery
The last thing to do to verify that the battery is bad is to put it on a charger. All we have to do is hit charge and it’s going to start charging. If this goes to that 12.6 volts that we need, maybe it’s not the cell that’s bad, maybe it just needed a recharge. But if the charger can’t charge to that voltage, then we know for sure our battery is toast.
For example, I left it on for a couple of hours, and you could see on the first photo below we’re almost at 12 volts, that’s pretty good. But what happens when we shut the charger? Charger is shut and immediately that voltage drops real quick, and that’ll end up settling around that 10.5 volts that we were just at. So we know for sure now that our cell is bad.

How to test your battery if you haven’t a multimeter
What happens if you don’t own a multimeter, or you don’t know how to test your battery, or you just want the convenience of somebody else testing it? Well, you could head over to your local Advance Auto Parts, and they’ll test your battery for free with no obligations to buy anything at all. They have a high-end load tester, and that’ll let you know for sure if it’s bad.
Extended battery diagtostic
If your battery gets a voltage is more than 11 V, you can be sure it hasn’t any broken cells, but a lot of times you’re going to go and park your car, and then a day later it won’t start. Maybe a week or two weeks later it won’t start. It should start with no problem if the battery is healthy. If not, we’re going to have to diagnose the problem. To do that it’s really easy. It could be a bad alternator, a parasitic draw, or a bad battery.
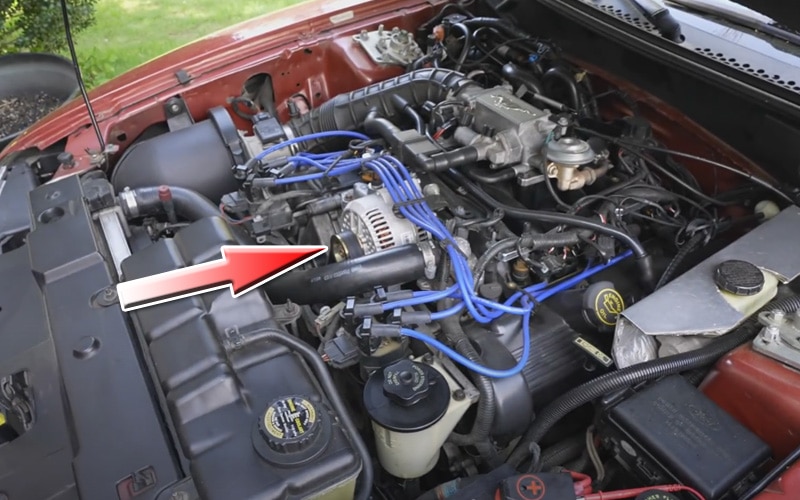
How to test the alternator
It’s really simple to test. We need to start the car to test the alternator. On a multimeter or on the car’s dashboard you can have about 14.3, 14.4 volts, that’s perfect. You want to be anywhere between 13.6 and 14.6 volts, that means your alternator is outputting the correct voltage. If it’s higher than 14.6, let’s just say it’s 15 volts, it could be a bad voltage regulator in your alternator, so you might have to replace that. You don’t want to have too many volts, more voltage isn’t good. Over 14.6 volts could damage your battery. So if you see that, that’s one problem.
Let’s just say you see the opposite problem. You see something below the 13.6 volt threshold. Well, we’re testing the voltage at the battery. So that doesn’t mean your alternator is bad necessarily, it could mean that between the positive post and the alternator, there’s a bad cable or a bad connection. So how do we verify that it’s actually the alternator that’s bad? If you see low voltage, you test the voltage at the actual alternator.
Be careful with your test, and don’t get any of the wires wrapped up in the belt that’s spinning, that would be very bad. The positive wire will help you to find your positive alternator connector. Your alternator case is your negative, that’s your ground. Connect the multimeter’s positive probe to the positive alternator’s connector. Negative probe to alternator case, scrape it a little bit to get a good connection.
If you find your voltage is low at the alternator, you can be pretty sure that your alternator is the problem. If you find your voltage is normal at the alternator, but low at the battery, then there’s probably a connection issue from your alternator to your battery. Connection with the positive wire on the alternator could be loose, it could be corroded, or the wire could be damaged or corroded, so check that.


So that’s how you test an alternator. Super easy to do. You can shut the engine and test for parasitic draw.
How to find a parasitic draw
Parasitic draw is an electrical component in your car that’s drawing on the battery when the car is shut off, and there really shouldn’t be much of a draw. The only things that should really draw on a battery when the car’s off is your security system, maybe the clock on the radio, and maybe your computer a little bit, but it shouldn’t be more than 50 milliamps. If you have more than that, your battery could drain overnight. It could drain in a couple days, it could drain in a week, depending on how big that draw is. So let me show you how to identify if you do have a parasitic draw, and then where that drop might be coming from.
The first thing you’re going to do is make sure everything in the car is off, there’s no interior lights on, there’s no headlights on. And if your hood is propped open, make sure your car doesn’t know the hood is open. Some cars have a hood ajar switch, if it does, press it down, tape it up, whatever you need to do, make it think that the hood’s closed. You basically want the car to go to sleep. If you have a key fob, especially a keyless entry fob, or your car starts with a push button, make sure you move this far away from the car so it could go to sleep.
We’re going to disconnect the negative terminal on the battery. Some people like to test on the positive side. I like to test on the ground side. That way if you ground out by accident, it doesn’t cause any damage. So unscrew and disconnect the negative battery cable. We’re going to bridge the gap between the battery terminal and the multimeter (you can see this on the photo below – digits “3” and “4”).
We need to take the positive cable from the regular spot on the multimeter and put it into the DC amp spot (you can see this on the photo below – digit “1”). Then we’re going to turn the multimeter to DC amps. You can see there are 10 amps (digit “2” on the photo below).

We need to use the multimeter leads to bridge the gap. One lead on our cable, it doesn’t matter which color, and then the other lead on our post. But to make a good connection, I’m going to just use one of these hose clamps, that way it’s nice and tight against the post (digit “3” on the photo above)
You can see on the photo we have about a 0.07 amp draw, so 70 milliamps. A rule of thumb is you want to be 50 milliamps or less. That varies from car to car, but 50 milliamps is an average. Since we’re pretty close at 70 milliamps, I’m not concerned, we don’t have a parasitic draw. If you had 100 milliamps, so 0.1 amps of a draw or higher, then there could be a problem.
Wait at least 15 minutes to make sure the car goes to sleep and then double-check that number. On older cars, they basically go to sleep right away. But if you have a newer car, definitely wait that 15 minutes, because it needs to go to sleep to make sure that your amp draw is accurate.
Let me show you how to tell where the parasitic draw is coming from. What you would do is you’d watch your multimeter and you’d pull out a fuse from a fuse panel. Just pull out any fuse and watch, does that affect the amperage? If No, it is ok, put the fuse back, and let’s move on to yuor next fuse. And so on and so forth until you see your amperage drops. So let’s pretend you pull some fuse and your amperage drops. Well, now we know, whatever this fuse is for, that is where our problem is located, so take a look there.

The other thing is, if you pull all the fuses in your car and you still have a big draw, check the cable on the alternator. Pull this cable off, disconnect it completely, and see if your draw stops. Sometimes there’s a draw in the alternator, and you wouldn’t able to find it just by pulling fuses.
Now, we know the alternator is working fine, we know we don’t have a parasitic draw, so that leaves us with a bad battery.
Why did the old battery go bad?
You might be wondering why did the old battery go bad? Here’s my example: I’m pretty confident the reason why is because I didn’t have this car on a trickle charger, and all winter long it was basically sitting there. I had it in storage. There’s no electricity. I forgot to disconnect the battery. So over time, that 70 milliamps draw that you saw when we did the parasitic draw test, that is going to drain the battery. Batteries don’t like getting drained and not recharged. When a battery sits and it’s drained, you decrease the life span of the battery. The reason why is because lead sulfate crystals bond to the grid of the battery, and that won’t let the chemical reaction inside the battery happen efficiently. The lead sulfate crystals block the electrolyte from contacting the grid, and you lose cranking amps and your battery degrades. So you always want to make sure you keep your battery fully charged.
If you don’t want your new battery to go bad, I suggest you to read this article: tips to extend your battery’s life or at least once a week start your car and go for a ride.
Not only is it good for the battery, but it’s good for the car too, cars are meant to be driven. Don’t just start it and then shut it off in a few minutes. You actually want to go for a ride and have that battery charge up.
Another option is to install a trickle charger, that way you just plug it in after you park your car for a long time. To install the trickle charger, it’s actually really easy. Here’s the guide: What is a Trickle Charger and How to Use it
What is a Load Tester and how to load test a car battery
Multimeters give us a ton of information and help us diagnose a bad battery. But the one thing they don’t do is load test the battery. I will show you how to use a load tester to load test your batteries. So let’s run through this real quick, just like any car, we’re going to start by removing the negative terminal first and then the positive terminal.
Connect the tester to the battery. Positive to the positive, negative to the negative. Choose your battery parameters. In my case, this is a regular flooded battery, then pick SAE for our measurement of cold cranking amps.

My battery is rated for 800 cold-cranking amps, so set it to that. I have about 350 cold-cranking amps compared to the 800 that we should have. It tells us that we need to replace our battery. I tested the other battery ang get 70 cold-cranking amps compared to the 800. This also is telling us to replace the battery. The battery charge is a little bit low, so I’m sure it’s a little bit higher than that, but at least it’s telling us these batteries are bad and need to be replaced:

Out with the old and in with the new. Don’t forget to add some silicone paste to the terminal ends. So there you go, that’s my ultimate guide on how to diagnose and replace a battery in your car or truck.
Next steps
Choosing the correct replacement battery
When you are sure that your battery is completely dead, you should know how to get the correct replacement battery. So I wrote this article for you: How To Choose The Correct Replacement Battery For Your Needs
Replacing the car battery without losing your settings
Instruction how to replace your battery you can find here: How to replace a car battery even without losing your settings
I hope this article was helpful. Remember, you want to try to avoid vibrations, avoid the heat, and avoid draining your battery and keeping it drained. Always keep it topped off, and that’ll keep your battery lasting a good long time. Hopefully, the article was helpful. If it was, remember to chare it. And all the tools and products I used in this article are linked in the article below.
Chris Magello is an automotive engineer specializing in educating people in fixing their own cars with step-by-step guides.
Page Contents


