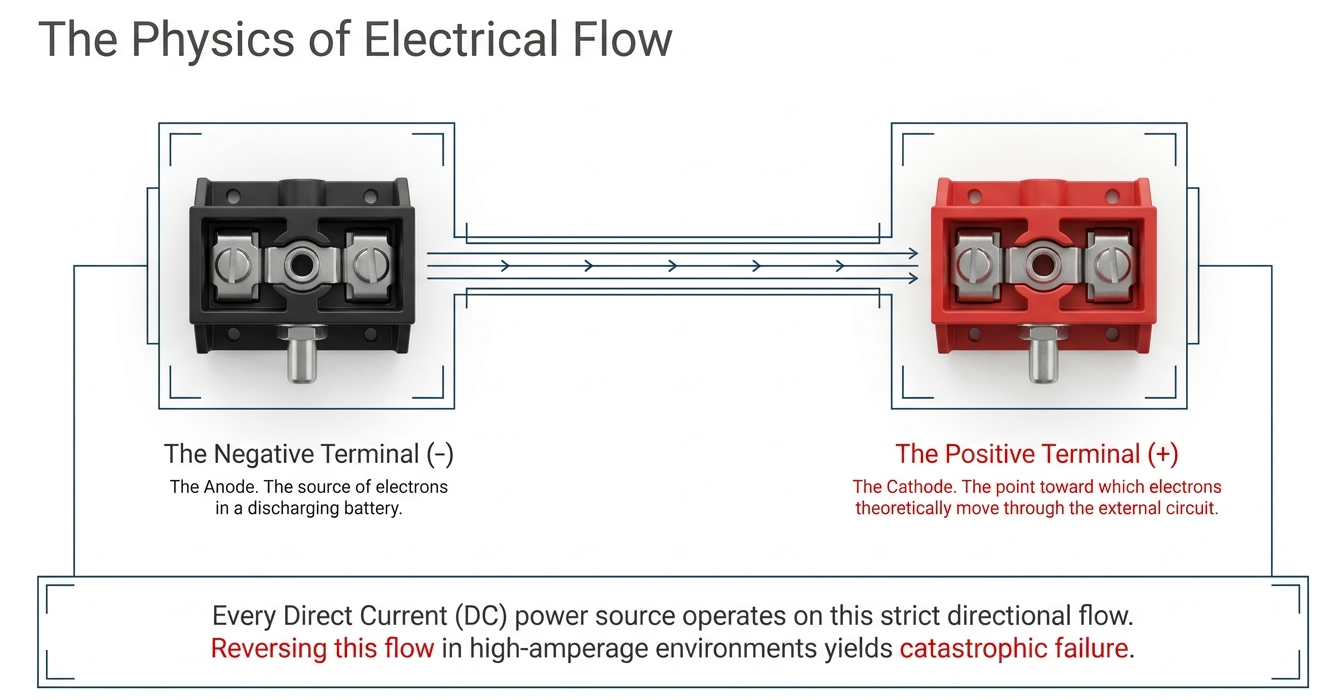
In the world of automotive and electronic engineering, battery terminal polarity is the most fundamental concept a user must master. Polarity defines the directional flow of electrical current within a circuit. Every DC (Direct Current) power source, from a tiny coin cell to a massive deep-cycle marine battery, operates using two distinct poles. Failing to respect these boundaries doesn’t just result in a device that won’t turn on; in high-amperage environments like a car engine bay, it can lead to catastrophic component failure, melted wiring harnesses, and even chemical explosions.

Understanding polarity is about more than just matching colors. It involves recognizing the physical standards set by manufacturers to prevent human error. This guide provides a deep dive into how to identify terminals, the physics of current flow, and the professional protocols for making secure, spark-free connections.
The Science Behind Positive and Negative Terminals
At its core, battery terminal polarity is the manifestation of an electrical potential difference. The Positive Terminal (+), often referred to as the cathode in a discharging battery, is the point toward which electrons theoretically “want” to flow through the external circuit. The Negative Terminal (−), or anode, is the source of the electrons.
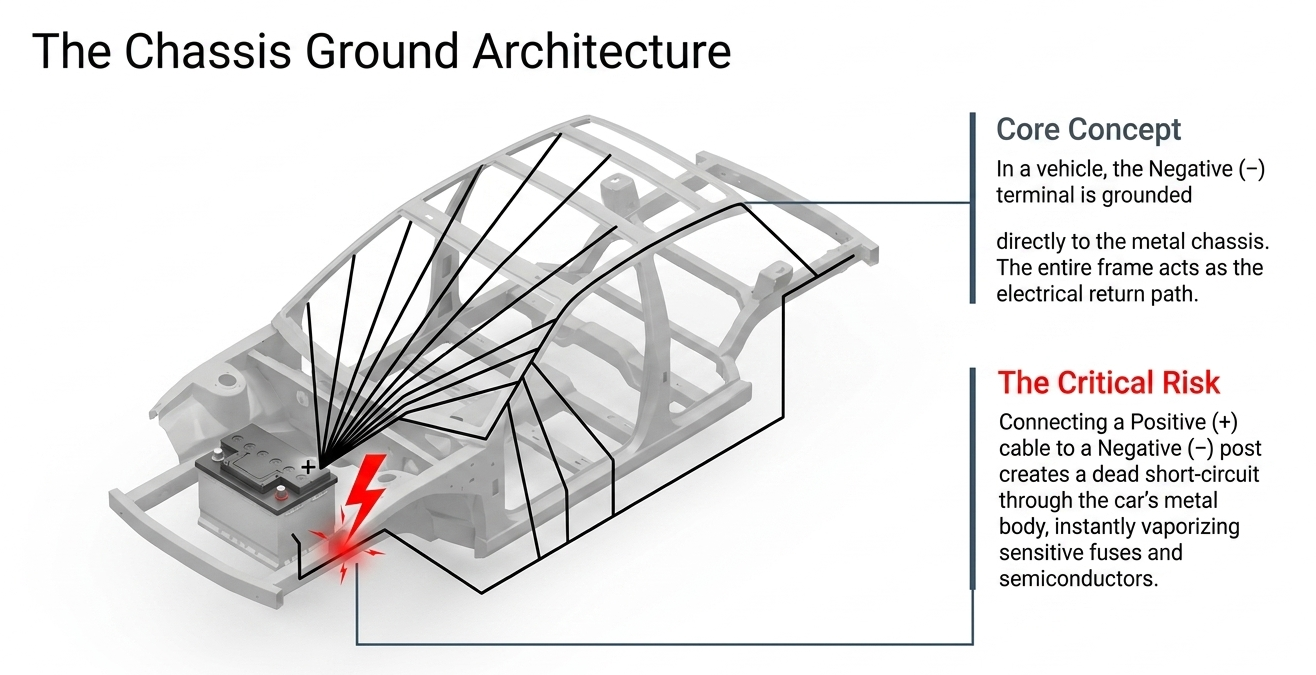
In a vehicle, the negative terminal is typically “grounded” to the metal chassis. This means the entire frame of your car acts as a return path for electricity. If you accidentally connect a positive cable to the negative post, you aren’t just reversing a fan—you are creating a dead short-circuit through the car’s entire metal body, which can instantly vaporize sensitive fuses and semiconductors.
Physical Identification: How to Spot the Difference
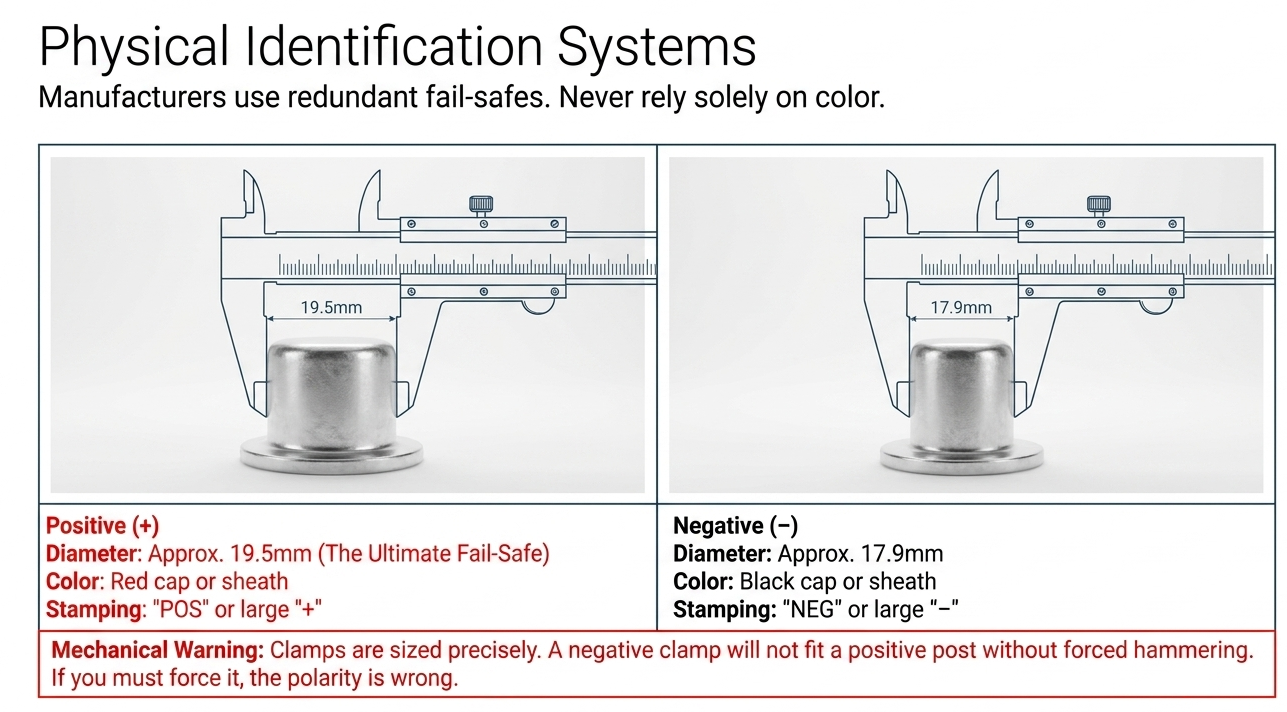
Manufacturers use multiple redundant systems to help you identify polarity, even in low-light conditions or when the battery is covered in road grime. Relying on just one sign (like color) is a common amateur mistake; a pro mechanic looks for at least two of the following indicators:
| Feature | Positive Terminal (+) | Negative Terminal (−) |
|---|---|---|
| Post Diameter | Slightly larger (approx. 19.5mm) | Slightly smaller (approx. 17.9mm) |
| Standard Color | Red cap or Red cable sheath | Black cap or Black cable sheath |
| Stamping | “POS” or a Large “+” symbol | “NEG” or a Large “−” symbol |
Post diameter is the ultimate fail-safe. Battery clamps are sized specifically; a positive clamp will usually feel too loose on a negative post, and a negative clamp won’t fit over a positive post without being forced. If you find yourself needing to hammer a clamp onto a post, stop immediately—you likely have the wrong polarity.
The Impact of Reversed Polarity on Modern Electronics
In older, purely mechanical cars, reversing polarity might only cause the radio to blow a fuse or the starter to spin the wrong way. In modern vehicles, the stakes are much higher. Today’s cars are essentially rolling computers with dozens of interconnected “modules” (ECUs).
- The Alternator’s Diode Bridge: The alternator uses diodes to convert AC to DC. Reversing polarity forces a massive current through these diodes in the wrong direction, usually frying them instantly and requiring a full alternator replacement.
- ECU Damage: While many computers have “reverse polarity protection” diodes, they can only handle so much. A sustained reversed connection can bypass these protections and destroy the main processor of the car.
- Battery Off-Gassing: Connecting a battery backward creates an internal chemical reaction that generates excessive heat. This can cause the battery to swell, vent flammable hydrogen gas, or leak sulfuric acid.
Professional Procedure for Connecting Battery Terminals
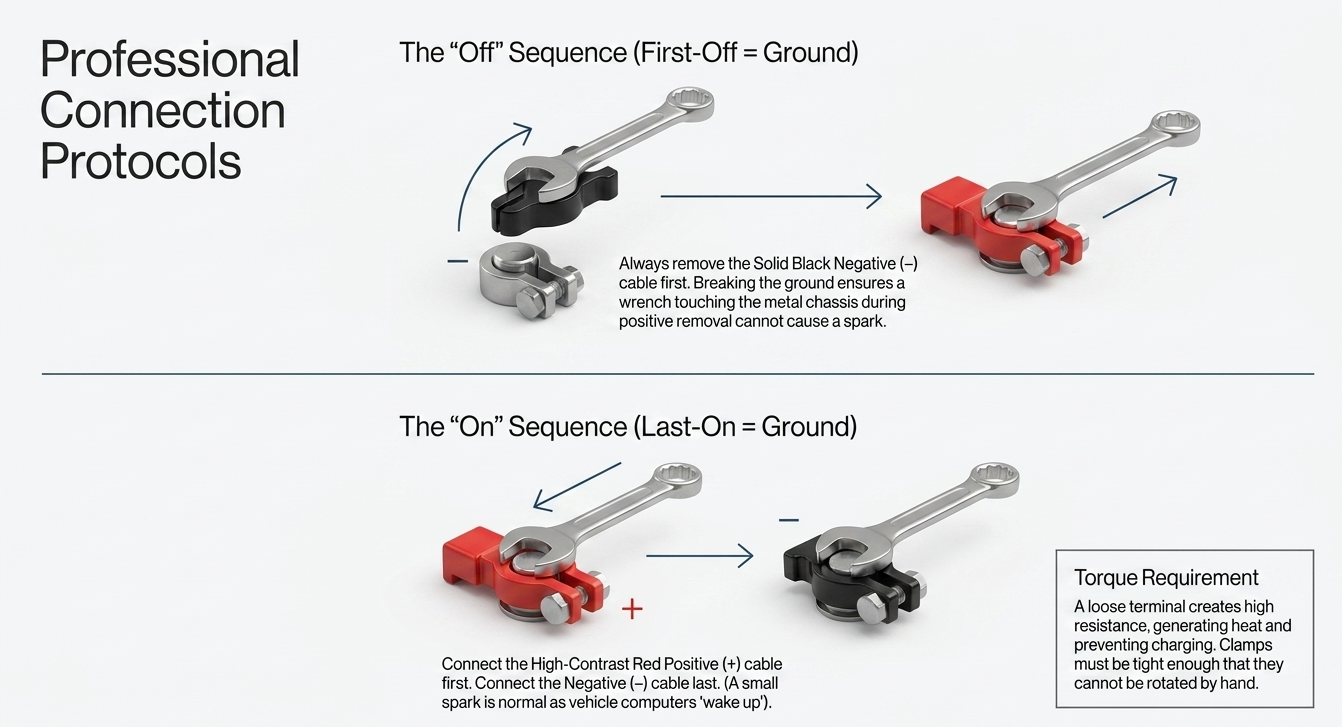
To avoid dangerous sparks and “surges” that can spike the vehicle’s electrical system, follow the “Last-On, First-Off” rule for the negative (Ground) cable. This is the professional standard used in every repair shop:
- The “Off” Sequence: Always remove the Negative (−) cable first. Once the ground is broken, your wrench can accidentally touch the metal frame while you remove the Positive (+) cable without causing a spark.
- The “On” Sequence: Connect the Positive (+) cable first. Secure the nut tightly. Finally, connect the Negative (−) cable. You may see a small spark; this is normal as the car’s computers “wake up.”
- Torque Matters: A loose terminal creates high resistance, which generates heat and prevents the battery from charging. The clamp should be tight enough that it cannot be rotated by hand on the post.
Managing Terminal Corrosion and Maintenance
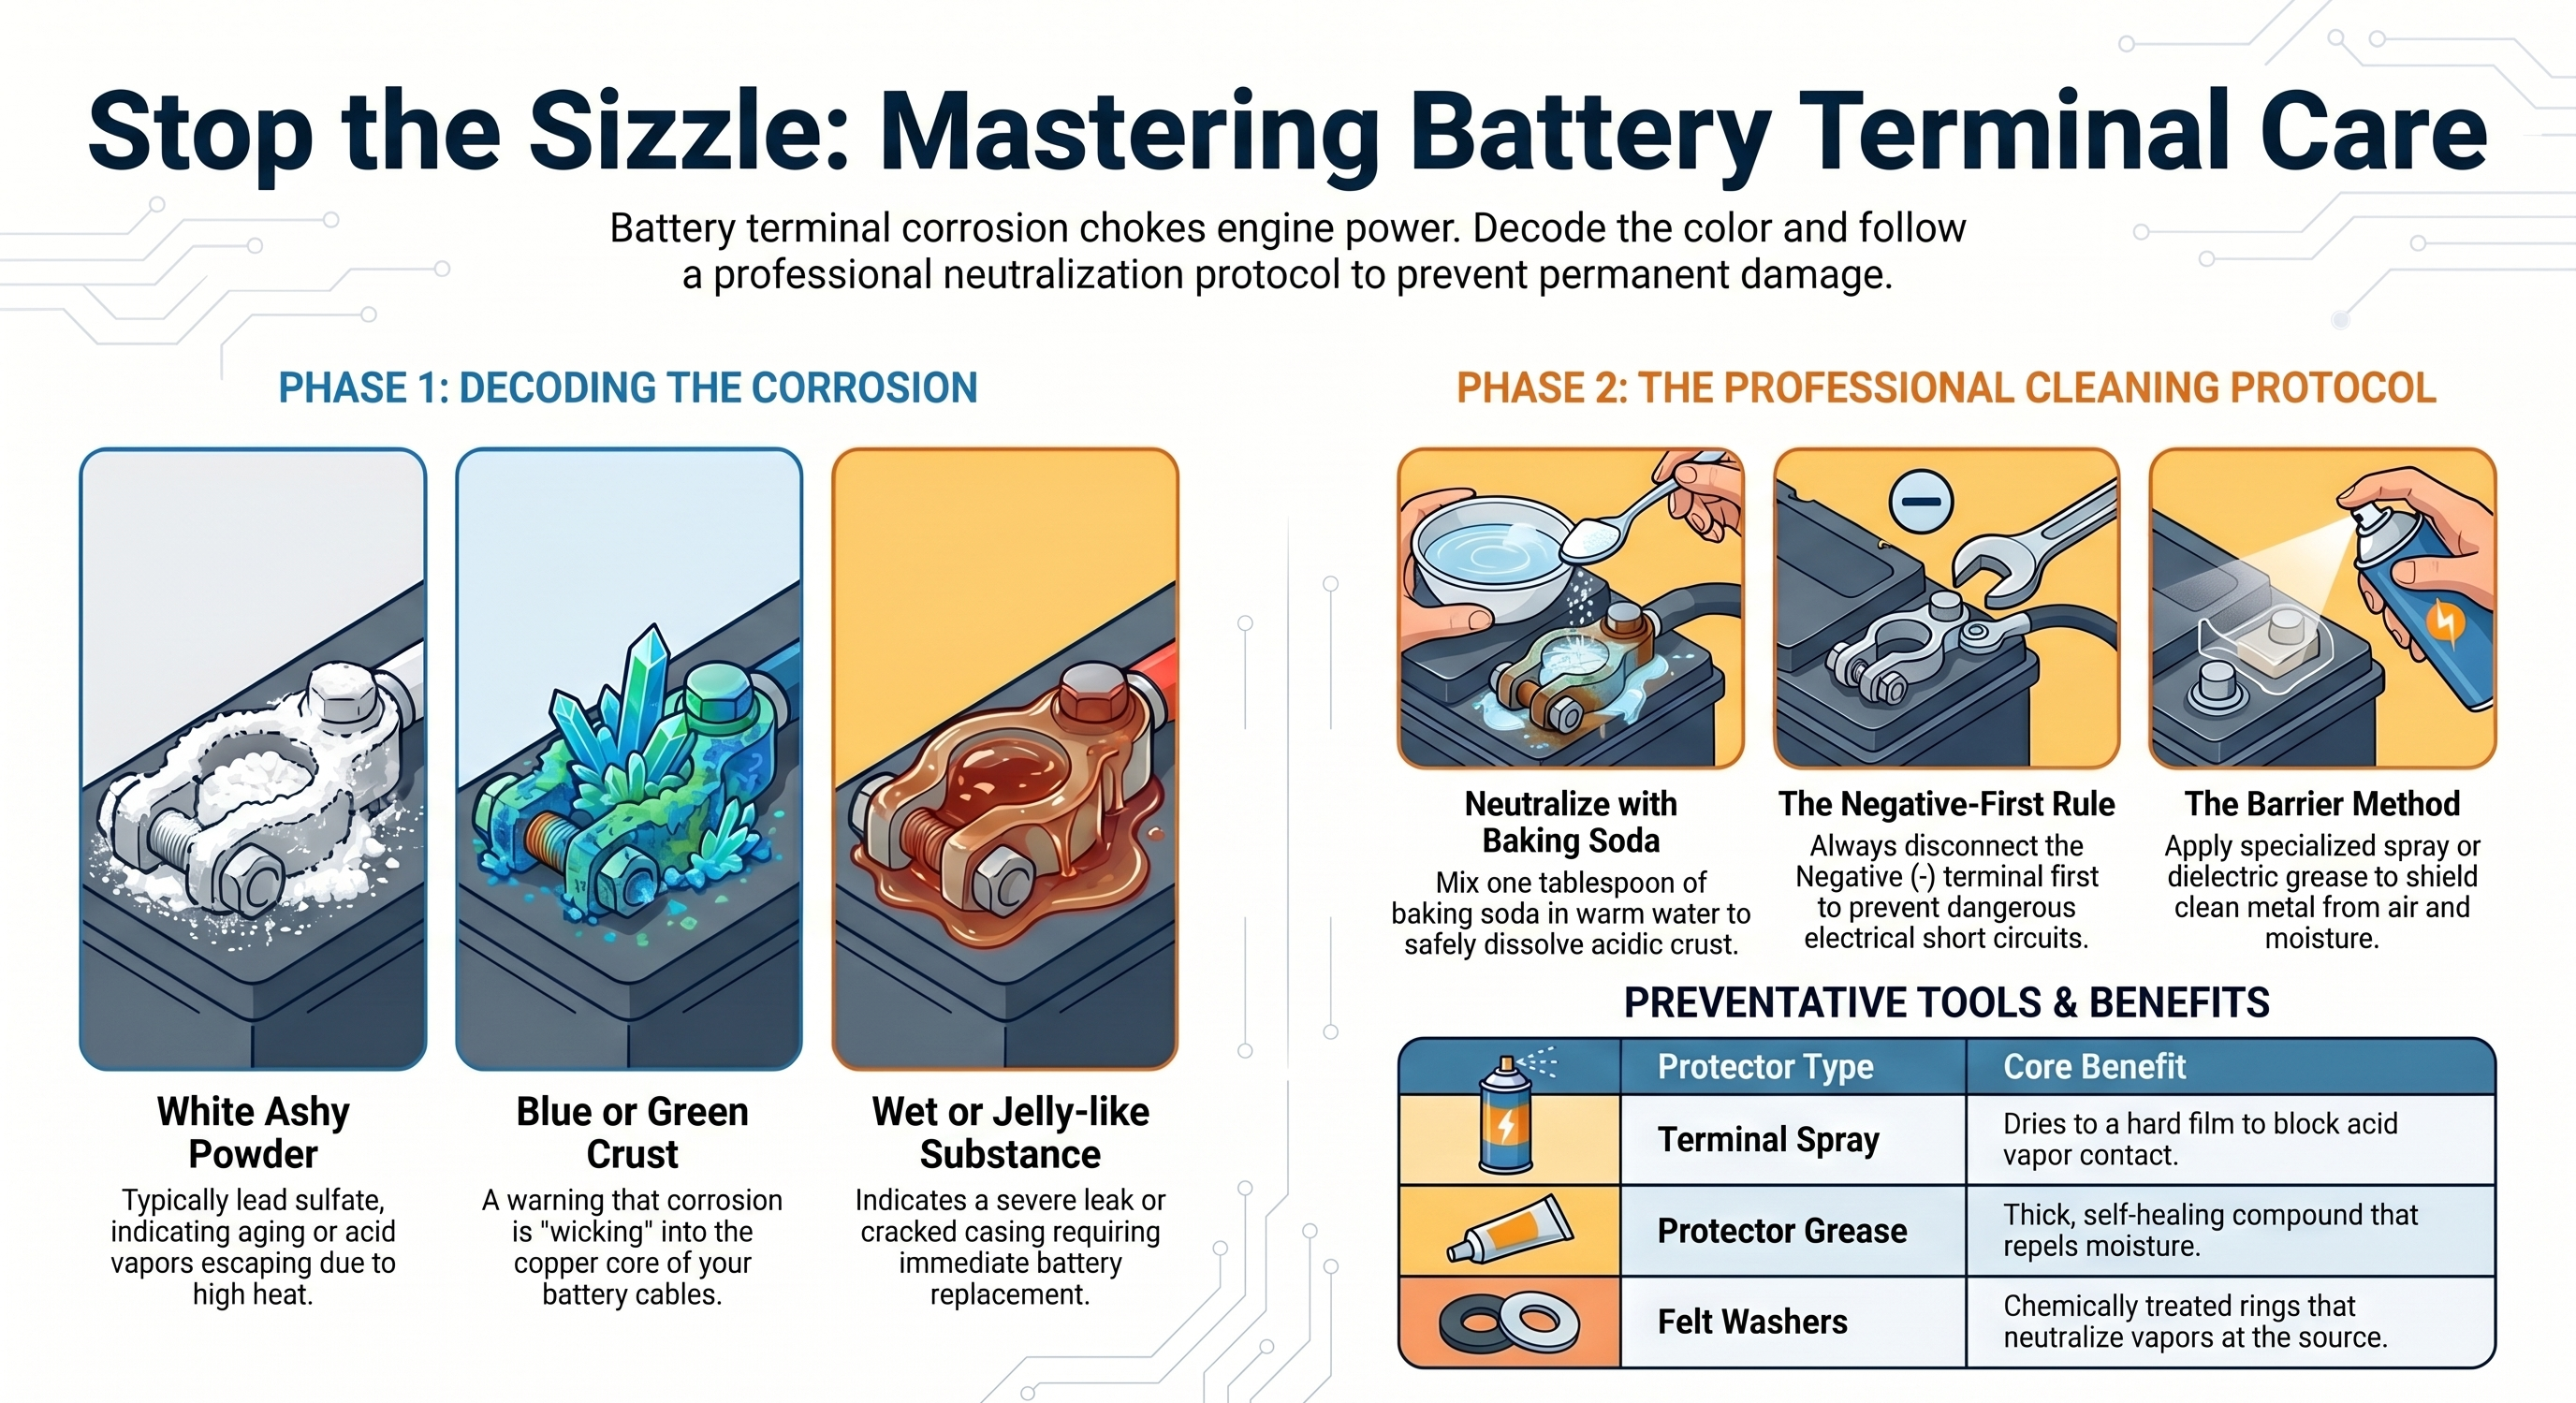
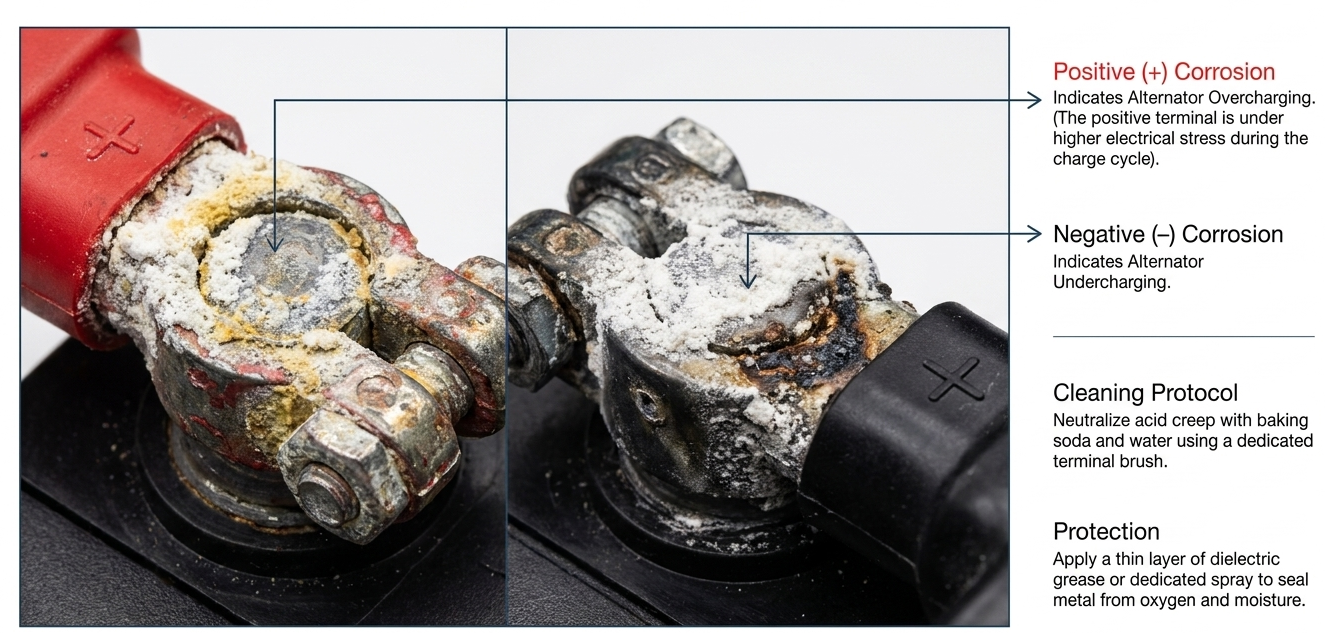
Polarity also affects how a battery corrodes. You may notice white, crusty powder (lead sulfate) accumulating on the terminals. Interestingly, corrosion on the Positive post usually indicates overcharging by the alternator, while corrosion on the Negative post is often a sign of undercharging.
- Cleaning Protocol: Use a dedicated battery terminal brush and a neutralizing solution (baking soda and water). This removes the acid that “creeps” up from the casing.
- Protection: After cleaning, apply a thin layer of dielectric grease or a dedicated terminal protector spray. This seals the metal from oxygen and moisture, preventing the “green crust” that leads to hard-starting issues in winter.
Voltage Behavior in Series vs. Parallel Configurations
When one battery isn’t enough—common in diesel trucks, RVs, and solar arrays—you must connect multiple units. Polarity is the deciding factor in how these batteries interact:
Connecting in Series (Increasing Voltage)
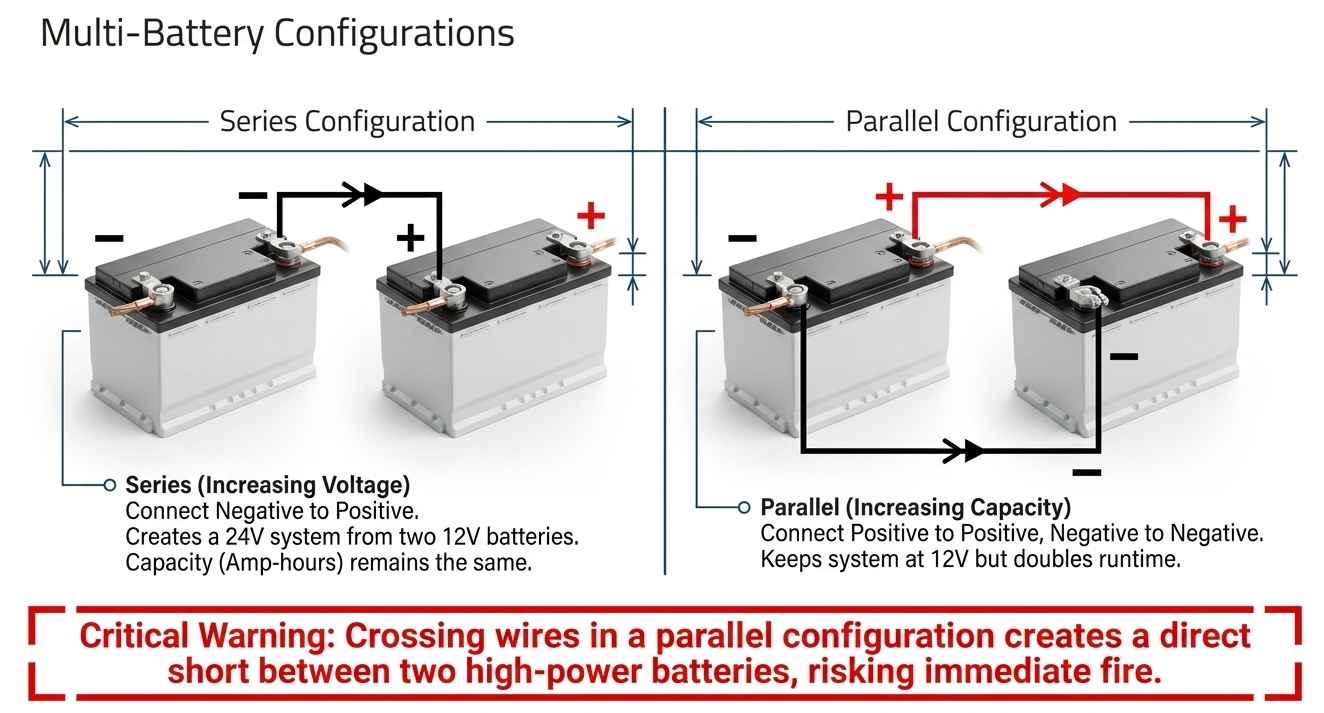
To create a 24V system from two 12V batteries, you connect the **Negative** of the first battery to the **Positive** of the second. The remaining open Positive and Negative posts become your system’s main terminals. This doubles the voltage but keeps the capacity (Amp-hours) the same.
Connecting in Parallel (Increasing Capacity)
To keep the system at 12V but double the runtime, you connect **Positive to Positive** and **Negative to Negative**. This is common in “dual-battery” setups for off-roading. Extreme caution is required here; if you accidentally cross the wires, you create a direct short between two high-power batteries, which can lead to an immediate fire.
Advanced Polarity Troubleshooting FAQ
Why is the positive terminal always the first one to corrode?
In most vehicles, the positive terminal is under higher electrical stress during the charging cycle. It’s also where copper-sulfate reactions are more likely to occur if there is even a microscopic leak around the plastic seal of the battery post.
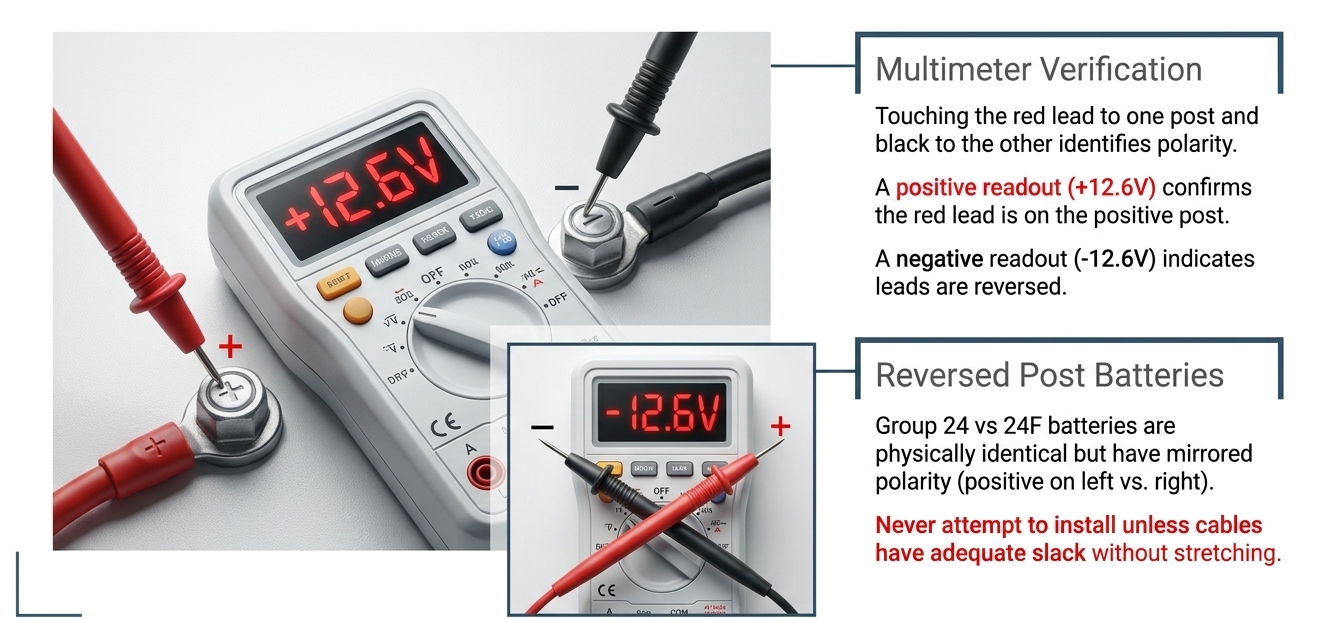
Can I use a battery with reversed posts (e.g., 24 vs 24F)?
Physically, the batteries are the same, but the polarity is mirrored. For example, a Group 24 has the positive on the left, while a 24F has it on the right. Never attempt to use a battery with reversed posts unless your car’s cables have enough slack to reach the opposite side without stretching.
Does a multimeter help identify polarity?
Absolutely. If you touch the red lead to one post and the black lead to another, and the screen shows a positive voltage (e.g., +12.6V), the red lead is on the positive post. If it shows a negative sign (e.g., -12.6V), your leads are reversed.
Ensuring Electrical Integrity through Proper Polarity
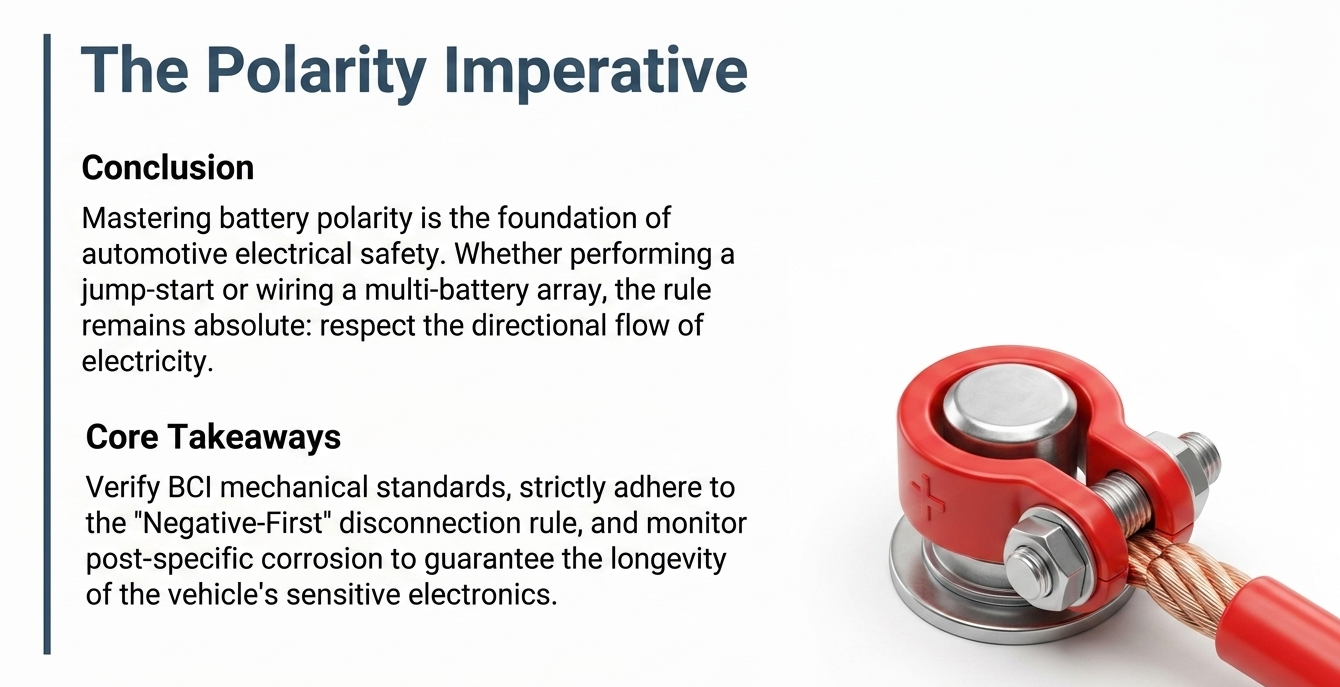
Mastering battery terminal polarity is the foundation of automotive electrical safety. By consistently verifying the BCI markings, respecting the “Negative-First” disconnection rule, and monitoring the specific corrosion patterns on each post, you ensure the longevity of both the battery and the vehicle’s sensitive electronics. Whether you are performing a simple jump-start or building a complex multi-battery solar array, the rule remains absolute: respect the direction of the flow, or risk a total system failure.
Eric Strong works in the automotive repair industry more than 20 years. His work included repairing electrical systems in various vehicle systems. A hybrid electric car battery replacement experience expanded his understanding of automotive battery technology.
Page Contents